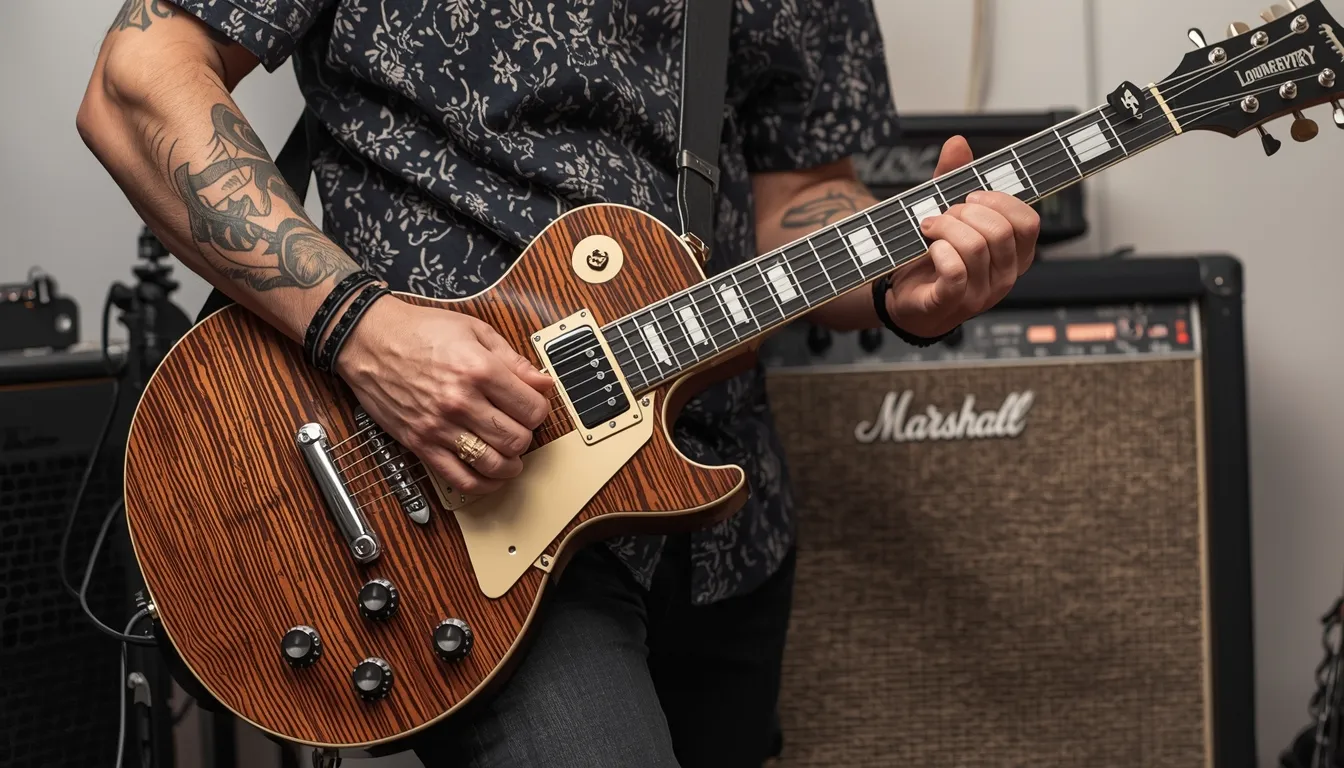
Have you decided to learn to play the guitar? Congratulations! The guitar is a wonderful, versatile instrument that you can literally play for the rest of your life. The guitar plays a role in all musical genres: rock, metal, pop, jazz, blues, country, orchestra, pop... it doesn't matter!
Learn The guitar For beginners it can be quite tiring due to the large amount of information available online. That's why we wrote this article, because sometimes the best way to learn to play the guitar is to just sit down and start instead of wasting time searching for the best guitar lessons online. Here you will find everything you need for your first guitar lesson.
In this article you will learn:
- the names of each string
- how to read chord diagrams
- how to play chords
- how to strum notes
- how to develop finger dexterity
- how to strum notes
- how to develop finger dexterity li>
- how to play a basic strumming pattern
The exercises and information here work equally good for both acoustic and electric guitar instruments.
Before we start playing, let's start with some basic playing exercises and hand care to set you up for success. Finally, we will work on hand coordination so that you can play the first chords.
This way you can develop awareness of what each hand does when you play the guitar.
Free guitar lesson for beginners
Let's talk about this, let's talk for a moment about how the guitar works. The guitar is a stringed instrument in which the notes on each string are separated by metal frets (unlike the violin or cello, where there are no frets).
Starting from the lowest sounding string (aka scrub) of the guitar, the strings are:
- 6th - E (low/thick)
- 5th - A
- 4th - D
- 3rd - G
- 2nd - B
- 1 st - E (high/thin)
The lowest string, measured in height, is the string closest to your chest when sitting in a normal playing position with a guitar on your lap.
- Since this is your first guitar lesson, you may not know what a properly tuned guitar sounds like.
- It is important to remember the melody . . the strings so you can learn what the pieces you're practicing should sound like.
- If the guitar isn't in tune, you're not actually playing the note you want to play.
If you play long enough and train your ear, you will eventually be able to hear when your guitar is out of tune. As a beginner, it is best to always use a tuner before playing. If you don't have a guitar tuner at home, you can use one online.
You can watch the video below to see how to tune your guitar.
Read Also: Mastering Guitar Solo Tabs: A Beginner's Guide
Chords for your first guitar lesson
Essentially music is made up of three elements: melody, harmony (chords) and rhythm. The guitar is a great instrument that allows you to manipulate all three elements of music.
- In your first lesson, we will focus on the harmonic and rhythmic side of the guitar . playing. guitar. Guitar: Also called rhythm guitar.
- We'll also look at how to play the most common chords and then go over a basic rhythm pattern so you can practice.
Below is a picture of a chord box or chord diagram.
- As you can see, it resembles the neck of the guitar.
- Each vertical line is a string.
- Each horizontal line is a fret.
- The leftmost string is the low E string.
- The thick black line at the top represents the saddle: the small strip of fabric where the neck of the guitar meets the headstock. This will keep the strings in place.
Now it's time to learn your first chord!
We recommend that all our beginner guitarists learn to play with a plectrum.
- Many guitarists don't use a plectrum, and that's far from being the case case, the case does not mean. It is not mandatory.
- However, basic picking technique is an essential skill for any guitarist.
- If you don't have a pick, don't worry. Simply use your thumb or forefinger to pluck the strings however you like.
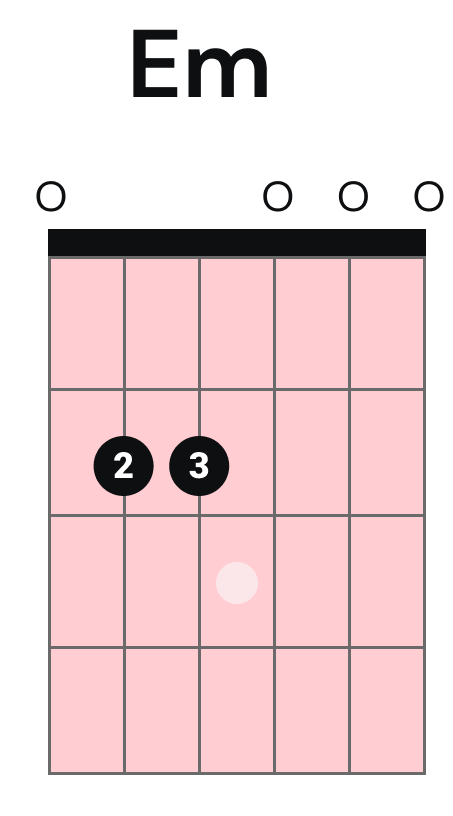
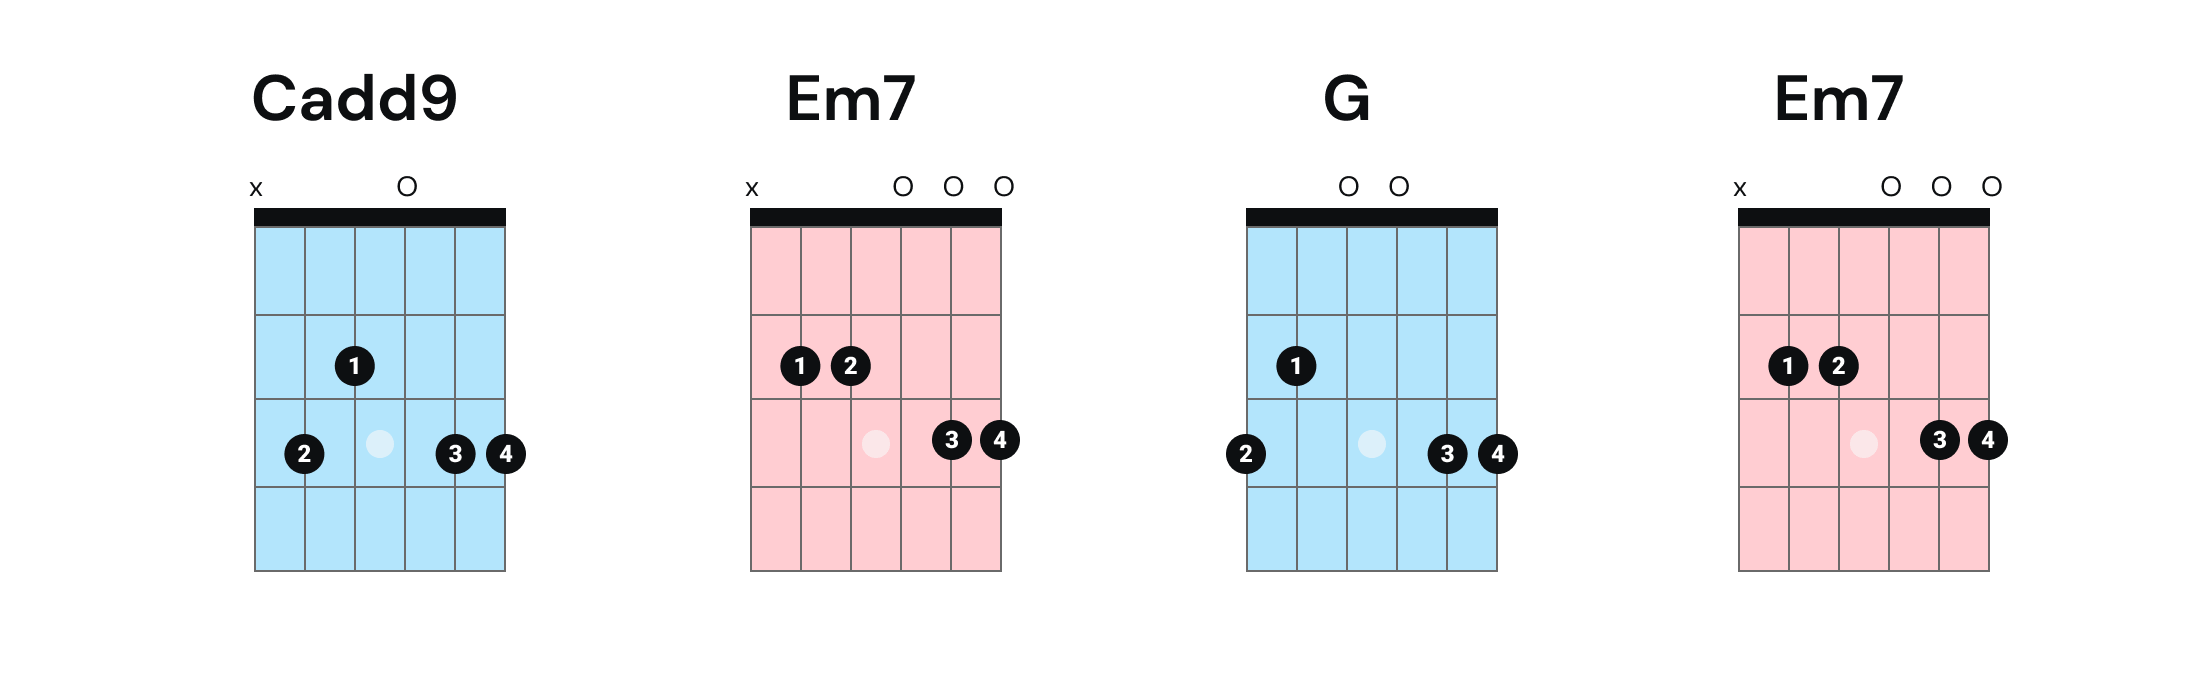
If you look at this image with the instructions above in mind, you will see the black circles showing where to press your fingers on the strings; in this case the second box A (5a). and D string (4th).
- Note: You should place your fingers between the metal keys, not on them.
- In the image above, place your fingers between the keys metal keys. metal keys.
- In the image above, place your fingers between the metal keys. metal keys.
- In the image above, place your fingers between the metal keys. first and second metal frets on the keyboard.
- We call this playing "on the second fret"; Technically you are playing from behind.
The numbers in the circles indicate which fingers to use. Each finger is assigned a number:
- 1 – index finger
- 2 – middle finger
- 3 – ring finger
- 4 - Little Finger
The white circles on the thicker black line indicate that you are strumming these strings, but don't worry about strumming the chord. They are also called “open chains”. Strum!
- The chord you just played is in E minor.
- If you find it uncomfortable and difficult to play, don't do that. just do it. Don't worry, it's normal.
- Try to get a clear chord sound so that all the strings sound clear

The next chord is in D major. This is where you add another finger to the mix, the ring finger (third finger).
Note that when you play this chord, you are not playing the lowest two strings, as indicated by the "X" above each string on which the chord is not played . box. However, you are playing an open D string.
Exercise #1: Chords for Beginner Guitarists
Then practice playing the chords. Some tips before you start:
- After playing a chord, play each string individually and make sure they have clean tones
- Focus on how your fingers feel in each chord shape.
- Start learning the chords one at a time, then practice switching between them.
You will play (some of) these chords later in this free guitar lesson. But first, practice chord shapes and develop that awareness (muscle memory) in your fingers.

The last chord, F major, will probably be the most complicated at first. Your index finger should play two notes on two separate strings. You'll find a chord like this more easily once you develop some strength in your fingers and hands.
Finally, pay close attention when playing the six strings. and if you don't. Playing a string that doesn't belong to a chord will change the sound of the chord (since you're adding notes) or create confusion, especially if you're playing an open low E.
Pickup Music members can get our official guitar chord chart, a perfect resource for checking out chords and learning all the basic shapes you need to play popular songs of all genres or create your own writing! !
Practice your digital skills
While you were working on those contract forms, you probably noticed that it was a real challenge for your fingers. Pressing on the strings risks damaging your fingertips or even breaking your skin.
This is completely normal for a beginner. The more you play, the stronger your fingers will become and playing will be more fun. The skin on the tops of the fingers becomes hard over time.
Exercise no. 2: Finger Exercises for Beginner Guitarists
Put your finger I on one string, one finger per fret, like this:

The goal is to move one finger without moving the others. Then, when you play the first note, you simply move your index finger on and off the fretboard. Do the same with the second finger. Be careful not to move your other fingers; Go as slowly as necessary at first.
Read Also: Exploring The Best Bass Strings For Beginners
Continue this exercise with all fingers and on all six strings.
Why it's important ? Move your fingers independently? The more you play, the more you will realize that you don't always have to move your fingers a lot to play different chords. For some chord progressions, you can leave a few fingers on the same frets all the time.
“Wonderwall” by Oasis is a good example. Look at this chord progression:
As you can see, the ring and ring fingers are always in the same place.
To improve your skills, we have an article on our blog about finger exercises for beginner guitarists. Some may be too advanced for your first guitar lesson, but others are perfect for beginners.
Exercise #3: Another finger exercise for you
Place your index finger on the first fret of the low E string and hit him with the choice. Then, keeping your finger in the same position, place your middle finger on the second fret and strum. Repeat with the third and fourth fingers. After the fourth finger, all fingers are pressed simultaneously on the E string.
Now reverse the order, starting with the fourth finger and moving down to the first finger of the first fret.
Develop good habits
Before you sit down to play, it's a good idea to warm up your fingers. Stiff fingers can cause you to train poorly and develop bad habits. For example, you don't want to lift your fingers more than 1cm off the string when you switch to different frets.
If you haven't stretched or warmed up When you do this If If If you do it correctly, your fingers will not have maximum dexterity and will not move as easily as needed. Here we summarize the essential finger stretches for guitar.
As beginner guitarists, we can feel overwhelmed and want to learn as much as we can, as quickly as possible. This can lead to bad habits, which in turn lead to sloppy playing.
Take time to learn the basics of guitar playing and expand your knowledge from top to bottom. with good habits and clean technologies.
Exercise #4 - Strumming patterns
So far you've learned to play a few chords in your first online guitar lesson. As mentioned above, music simply consists of chords and melodies played in rhythm. Now let's look at some rhythmic chord patterns (or beats).
When playing open chords, you can make an up or down motion . A down stroke is the strumming motion in which the hand moves across the strings in a downward motion towards the ground. The serve starts low and passes through the strings towards the chin.
Exercise n.4A:
When you play, the main movement should come from the wrist. The rest of the arm should move as needed to support wrist movement. Your arm should be relaxed and resting on the body of the guitar.
With your left hand, mute all six strings by placing your fingers on they. Practice hitting the strings softly with your right hand at the right time, using only the downward motion (indicated by “D” in the table below). Use a metronome or tap your foot to the beat to strum. Play every time the metronome sounds or your foot touches the floor.

Practice for a few minutes until you have a good idea of how to hit the strings.
Be careful not to play the strings too loudly or too slowly. Play in one quick motion, touching all the strings in one quick motion. When you play a real chord, you want all the strings to sound like one string and not each string to be played individually.
Exercise #4B:
Maintain the rhythm (as described above) and alternate downward and upward movements.

Exercise #4C:
So we're back to descenders, but add a ascender between counts 3 and 4. If you do this with each kick, the upward motion should be performed in the next pattern as the foot is lifted before landing again on the fourth kick.
Once we have found the right strumming sensation, we can move on to the actual chords!
Exercise n. 5: Changing Chords According to the Rhythm
Now practice these basic chord patterns. Changing the rhythm of chords requires coordination between the right and left hands.
Choose two chords that you are most familiar with and practice strumming and switching between them.
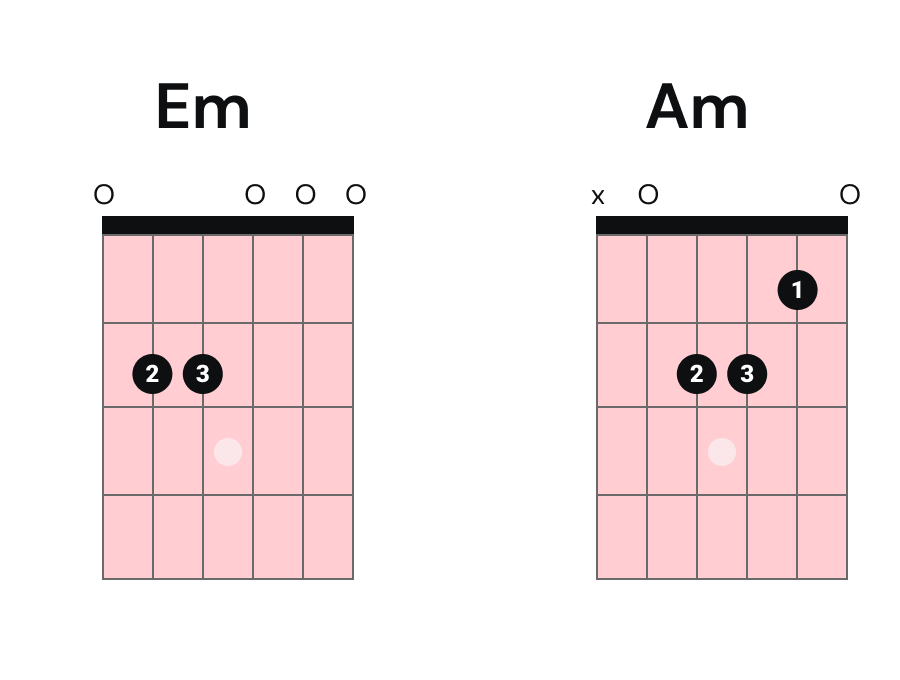
We recommend starting with two simple open chords, E minor and A minor.
Play a bar of E minor and then switch to a bar of A minor. One measure corresponds to four beats. Then he plays four bars on each chord. Once you feel comfortable playing the chords, add a third and then a fourth chord to the mix.
This exercise helps you coordinate your left and right hands.
Conclusion:
You have completed your first guitar lesson. Good game! Return to this article to practice chord and fingering exercises with different chords to add variety.
Learning an instrument is a journey with many ups and downs: the guitar it's not it's dfferent. Sometimes it will be easy, sometimes you will be frustrated because you can't do something that seems simple. It is important that you follow your path step by step. Develop good habits, learn the basics and enjoy the process.
At Pickup Music we have an article on how to set goals on the guitar, whether you are a beginner or an advanced guitarist. Learning to set goals and break them into smaller steps will help you track your progress and stay motivated.